Weightlifting
Breaking Down the Olympic Weightlifting Lifts: Understanding the Snatch and Clean and Jerk

The Snatch and Clean & Jerk are the two competitive events of the sport of weightlifting. The two movements are arguably the greatest combinations of strength, power, coordination, and kinesthesia in international sports.
Both events require the development of maximal strength in the majority of skeletal muscles. Furthermore, that strength must be generated in a very short period of time, and as such, the power output is greater than in any other athletic event. The most efficient weightlifters flex and extend their joints through full ranges of motion, and therefore, the lifts require a high degree of joint mobility. Because of the mobility requirements, a large percentage of the skeletal muscles must inhibit rapidly, a key factor in speed development.
Effective performance of the two lifts requires a high degree of kinesthetic sense in order to react to the barbell.
The training for the sport requires a high degree of anaerobic endurance as maximal and submaximal weights are performed with minimal recovery intervals.
The Snatch Lift - Technique and Execution
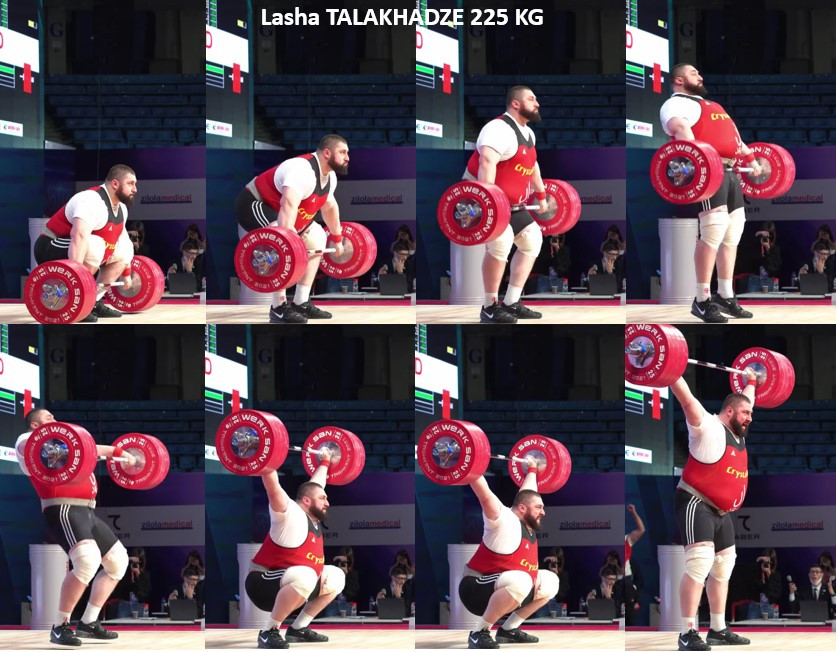

In the snatch, the barbell is pulled from the floor and caught overhead on straight arms without stopping. There are two critical phases and one less significant one.
The first critical phase is the pull, which can be further subdivided into 3 distinct segments.
The set-up: The feet should be placed at hip-width apart and may be pointed slightly outward. The foot placement should be such that the bar is directly above the metatarsal phalangeal joint of the big toe. The distance between the hands when gripping the bar should be equal to the distance between the elbows when the arms are outstretched to the sides and parallel to the floor. The grip should be an overgrip.
At the start, the shins should be in contact with the bar which is above the metatarsal phalangeal joint of the big toe. The arms should be straight, with the elbows rotated to the sides
and the back maintained in a natural lumbar curve. The shoulders should be ahead of the bar and the eyes should be looking straight ahead. The tension of the lats should be maintained through the first and second segments.
The first segment lifts the bar from the floor to above the knees by extending the knees and hips. The angle of the torso in relation to the floor should not change. The center of pressure on the foot should move from the ball of the foot to the front of the heel. The speed of the bar should be controlled so that the torso angle is maintained.
The second segment is transitional in that the knees rebend as the bar rises until the body is in the power position. It is called the power position as it is the position from which a human can generate the greatest amount of power. The center of pressure moves from the front of the heel medially to the ball of the foot. The shoulders remain ahead of the bar. The speed of the bar will be slightly diminished from the first segment. At the conclusion of this segment, the bar should be in contact with the thigh. The point of contact will vary with the grip width and the ratio of torso length to arm length and body weight.
The third segment is the point of the greatest acceleration. Hip extension, knee extension, and plantar flexion of the ankle, coupled with trapezius contraction and elbow flexion, combine to generate the greatest speed of the bar. The lumbar curve should be maintained throughout.
The second phase is the drop-under and catch. Speed going under is critical. As soon as the peak acceleration of the bar is achieved, the drop under is initiated by skimming the feet to the side. This takes place in under to initiate the unlocking of the extended hips and to take a stance that enables the greatest stability in the full squat. Speed under the bar is facilitated by a rapid flexion of the hips which is then followed by a rapid dropping of the elbows and pushing the body down with elbow extension. This final action by the arms enables a feeling of bar position and increases the chances of success. This arm action is speediest if the grip is relaxed.
The third and final phase is the recovery to a standing position. This is best achieved by attempting to push the floor down with the feet. This will help to maintain the bar within the limits of balance. This recovery should be performed without a jarring conclusion as this can cause an unlocking of the elbows that could cause a failure or an infraction of the rules.
THE SNATCH—Rationale for optimal technique
Modern snatch technique is based on optimal biomechanics. This allows the body to generate the most power. Furthermore, because optimal biomechanics enable the muscles and joints to develop synergistically, there is less chance of exceeding the structural limits that would lead to injuries. The heaviest lifts are invariably performed with optimal or near-optimal technique. The technique should be mastered before or concurrently with strength development in order to ensure the most balanced and efficient neuromuscular development.
Common Mistakes to Avoid in The Snatch Lift
The following common mistakes hinder the maximal performance of the snatch:
- Attempt to generate maximum pulling speed from lift-off. This will place the body in such a position that maximum bar speed is unattainable.
- Excessively wide grip
- Rotating the arms inward at the start
- Moving the feet before fully extending the hips and knees
- Gripping the bar too tightly during the drop-under and catch
The Clean and Jerk Lift - Technique and Execution
THE CLEAN—Technique and Execution
In performing the clean, the bar is pulled from the floor and caught on the shoulders while squatting. As in the snatch, there are two critical phases and one less significant one.
The first critical phase is the pull which is further composed of three distinct phases.
In the setup, the feet are placed slightly wider than for the snatch, with the feet pointing slightly outward. The feet should be placed under the bar so that the metatarsal phalangeal joint is directly below the bar. The grip is an overgrip and is slightly wider than shoulder width. The knees are bent so that the shins are in contact with the bar. The shoulders should be slightly ahead of the bar, and the lumbar curve should be maintained. The lats should keep the bar from swaying forward. The center of pressure of the foot should be at the ball. The head should be held upright with eyes focused on a point slightly above standing eye level.
The first distinct phase is the pull from the floor to slightly above the knee. The lift is enabled by extending the knees and hips simultaneously while keeping the angle of the back in relation to the floor stable. The lats should maintain tension in order to keep the bar pathway vertical. The center of pressure on the foot moves from the ball of the foot at liftoff and travels rearward toward the front of the heel. Any effort to move the bar around the knee will force the center of pressure too far back on the heel.
The second phase is the shift from slightly above the knee to contact with the thigh at the power position. At this point, the center of pressure moves forward from the heel and medially to the ball of the foot. The lats should be used to help maintain the vertical pathway of the bar.
The third phase is initiated by the concurrent explosive extension of the hips and knees and the plantar flexion of the ankles.
Once this explosive pull takes place, the drop under the bar can commence. The feet skim to the squatting stance, and the hips flex rapidly. The grip is relaxed in order to enable the rapid rotation of the elbows forward. The athlete should attempt to get the shoulders under the bar and slow the descent. Most lifters will involuntarily move the grip closer during this racking of the bar. This phase of the descent is called the amortization phase.
Once the lifter reaches the deep squat position, the ascent should begin immediately, making use of the elasticity of the bar to initiate the upward momentum. The back should be kept straight while maintaining the lumbar curve as the lifter moves up to the standing position.

Common Mistakes to Avoid in the Clean
The most common mistakes are
- an excessively rapid first pull that can cause a deviation of the lumbar curve and the premature movement of the center of pressure to the heel.
- Premature arm bend can inhibit trapezius contraction.
- A rapid drop into the full squat without an attempt to contact and amortize the bar can lead to a forward loss of the bar or a forward flexion of the spine that will make the stand more difficult.
- Failure to properly move the feet during the descent can result in a weak receiving position.
THE JERK—Technique and Execution
The jerk is the movement that generates the greatest power output.
A small fraction of the world’s elite lifters use the power jerk (which is not as efficient as the split jerk), or the squat jerk (which is more precarious. The vast majority of jerks at the international level are split jerks, and as such, they will be analyzed in this place.
Quickly simply the bar is driven overhead with a leg drive to arms length in a single movement. The feet need to be on a line parallel to the bar at the completion of the movement, as in the snatch.
There are four distinct phases to the jerk.
- The Dip
- The Drive
- The Split under
- The recovery
The dip
The dip should commence with a stance of hip width. Ideally, the knees should be unlocked. The rules state that the knees must be straight, but they need not be locked. The spine must be maintained in a natural curve with the bar resting on the shoulders. The grip is relaxed, and the lower the elbows, the greater the role of the arms in the drive. If the knees are unlocked, the knee flexion will result in minimal hip flexion. Excessive hip flexion during the dip will direct the bar pathway forward. The knees should bend to the same degree as the power position, but the center of pressure on the feet will be on the heel. The speed of the dip should not be faster than the descent of the bar. The shoulders must remain in contact with the bar throughout the dip and the first part of the drive. A loss of contact between the bar and shoulders will result in a failure to transfer the full extent of the drive to the bar.
The drive
begins as soon as the bottom of the dip is reached. The knee extension, hip extension, and plantar flexion of the ankles occur simultaneously to drive the bar vertically. The arms may be involved in the drive if the elbows are held relatively low during the dip. If the elbows are held high (the result of a relatively long humerus), a premature elbow extension will cause the bar to deviate from a vertical pathway. During the drive, the center of pressure moves rapidly from the heel to the ball of the foot.
The Split Under
The finishing position of the feet must be first determined. Kneeling on the rear leg and determining a 90-degree angle between the thigh and shin of both legs will place the feet in the proper receiving position.
As soon as the full extent of the drive is completed, the feet can move into the split. The rear foot should skim the platform, while the front foot prances. This ensures that the rear foot gains traction first and this results in the body being driven slightly forward and directly under the bar. The arms should lock under the bar at the same instant that the feet gain traction.
The Recovery
With the bar locked out overhead, the athlete can lean slightly backward and this will remove some pressure from the lead foot and allow that foot to return back to the starting position. The rear foot can then recover forward to the starting stance.
Common Mistakes to Avoid in the Clean and Jerk Lift
- A short dip will not generate the same degree of vertical power.
- Locking the knees will result in a premature hip flexion.
- Dipping too fast will inhibit the transfer of power to the bar.
- Allowing the torso to bend during the dip and drive can result in a forward jerk
- Splitting the feet prematurely can inhibit the power of the drive.
- Gripping the bar too tightly will inhibit elbow extension.
- Short-stepping the front foot in the split can result in losing the jerk forward.
- Recovering the rear foot first can result in losing the bar forward.
Benefits of Olympic Weightlifting
This refers to the use of snatches, cleans & jerks, their derivatives, and squats as core lifts for the training.
- The proper execution of the snatch and clean & jerk generates a great deal of isometric contraction on the part of the torso musculature. This is a major function of these muscles and is the only way to develop them fully.
- The lifts require the muscles to function synergistically, which means that many motor nerves are transmitting simultaneously in order to generate great force rapidly.
- The explosive movements require that antagonistic muscles must contract and then relax very quickly. This has great carryover to athletic movements that must be executed quickly.
- Because of the tremendous energy expenditure in each repetition, these lifts are particularly effective at improving anaerobic endurance.
Training and Conditioning for Olympic Weightlifting
Barbell Exercises
the greater portion of weightlifting training is performed with the barbell. While other activities may use a variety of implements to train the various components of conditioning and technique acquisition, weightlifting can accomplish these goals primarily with a barbell.
- Snatches or power snatches, cleans or power cleans, jerks or power jerks should be included in each training session in order to refine technique, develop strength, enhance speed, and develop anaerobic endurance for more rigorous training.
- Squats and/or front squats have a positive effect on the development of overall strength due to their stimulation of the endocrine glands. They specifically develop leg strength and enhance the isometric strength of the torso musculature.
- Presses and Push Presses further enhance shoulder development and synergy of the torso musculature as well as maintaining shoulder mobility.
- Deadlifts and pulls strengthen the pulling musculature and when programmed properly can improve anaerobic endurance and supplement grip strength.
- Good Mornings enhance hip extension, hamstring mobility, and trunk stabilization.
- Overhead squats develop the ability to balance the bar overhead and provide more opportunities for torso stabilization.
Other Modalities
- Sprinting enhances explosiveness and non-transmission of motor impulses to the legs, and when performed properly can affect the development of the musculature of the foot.
- Vertical jumps develop an explosive extension of the hips and plantar flexion of the ankles. Box jumping can help but not if there is an overemphasis on hip flexion and not hip extension.
- Plyometric jumping can train the nervous system to effectively perform digitigrade movements which will also aid in the development of explosive qualities
- Grappling performed early in the development of the athlete enhances kinesthesia and the responsiveness of the nervous system.
- Two-handed throwing of medicine balls, weighted hammers, and shots can enhance hip and knee extensions.

Equipment Needed for Olympic Weightlifting
The minimum equipment for weightlifting training is very basic. The equipment needed for effective training is as follows:
- An 8-foot x 8-foot wooden platform. Wood provides solid footing but still enables cushioning that spares excessive impact on the joints of the athlete. Rubber runners will help to prolong the longevity of the bumper plates, but are not a necessity.
- A quality Olympic bar that revolves smoothly provides optimal traction for the grip and sufficient elasticity for the weight range employed by the trainee.
- Rubber bumper plates will spare the platform and will last a long time as long as they are not abused.
- Adjustable squat racks
- Weightlifting shoes should be light, and provide appropriate pitch, adequate cushioning, and stability to aid in balancing heavy weights overhead. The flex point of the sole should align with the ball of the foot.
- Weightlifting straps are helpful when the grip is fatigued toward the end of a session or during the performance of hang movements.
Conclusion
The preceding is a general overview of certain aspects of training for the sport of weightlifting. Each of the aforementioned categories can be greatly expanded to deal with the individual needs of the athlete, and those needs can vary with the experience and athletic age of the individual.