Weightlifting
Get It Right.... From the Start!


In many cases, a missed lift results from a less-than-perfect starting position. This may happen when a novice lifter is still learning how to properly set up. It may occur even in experienced lifters if they are rushed to the platform with only seconds remaining on the clock.
Lifting should be a simple task since we know that the shortest distance between two points is a straight line. And, if we were performing deadlifts, we certainly would want the bar to move vertically. But, for the snatch and the clean, it has long been known that the optimal pathway (trajectory) is somewhat like the letter “S.”
The success of a snatch or a clean is largely dependent on being able to get into the strong “power” position from which peak power can be applied. This posture occurs at the end of the transition, just before the explosive second pull.
This really makes the ideal barbell trajectory curvilinear rather than straight. Of course, a curved line is really a series of shorter straight lines. How can we best set up and start the lift in order to achieve optimal performance at the most crucial part of the pull?
Thanks to the illustrative skills of fellow Olympic Coach Roger Nielsen, please study the next several PowerPoint slides to see how trajectory, center of pressure of the foot, and getting into the strongest possible pulling position for the snatch or clean come together.
The Pull
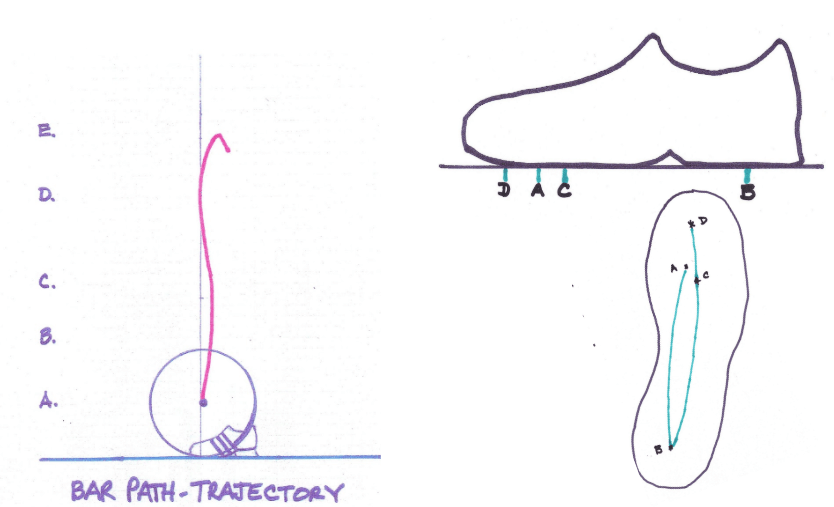
This slide reflects the theoretical bar path (red), the set-up position relative to the bar and foot, and five phases of the lift: A) get set, B) end of first pull, C) transition, D) end of second pull, and E) pull-under, or turnover.
Dr. John Garhammer determined with force plate research that the center of pressure on the foot during a lift is dynamic, moving to various parts of the foot during the pulling action. Note the four phases identified in drawings of the lifting shoe from overhead and from the side. During the pull-under phase, the foot is flat, with the center of pressure in the middle.

The Modified ‘S’ Pull
Conventional advice suggests the lifter place the feet under the bar so that when looking down prior to gripping the barbell the bar appears over the metatarsal phalangeal joint (MTP), the widest part of the foot. At lift-off the center of pressure is toward the front part of the shoe (A). This requires the lifter being a distance from the bar, resulting in dorsiflexed ankles, and knees forward. This position places a good deal of the initial work on the quadriceps.
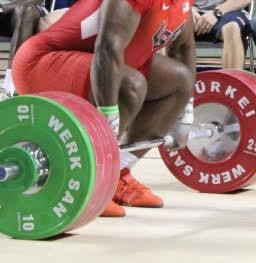
Here is a great shot of an efficient get-set position. Imagine a vertical line from the bar to the platform. You see that the bar is even a bit farther forward from the MTP; it is near the ends of the shoes. Note the well-dorsiflexed ankles and knee location.
Far too many lifters crowd the bar, placing it much closer to the ankles before squatting to take a grip. This keeps the ankles fairly neutral, with the shanks (lower leg segments) nearly vertical.
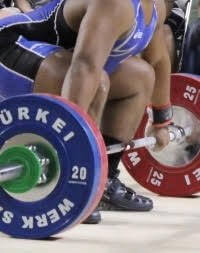
By comparison, this lifter’s center of pressure is near his heels. Crowding the bar is great for the deadlift but not for snatch and clean. Note that the bar is much closer to the ankles, and the shins are nearly vertical.
Putting It All Together
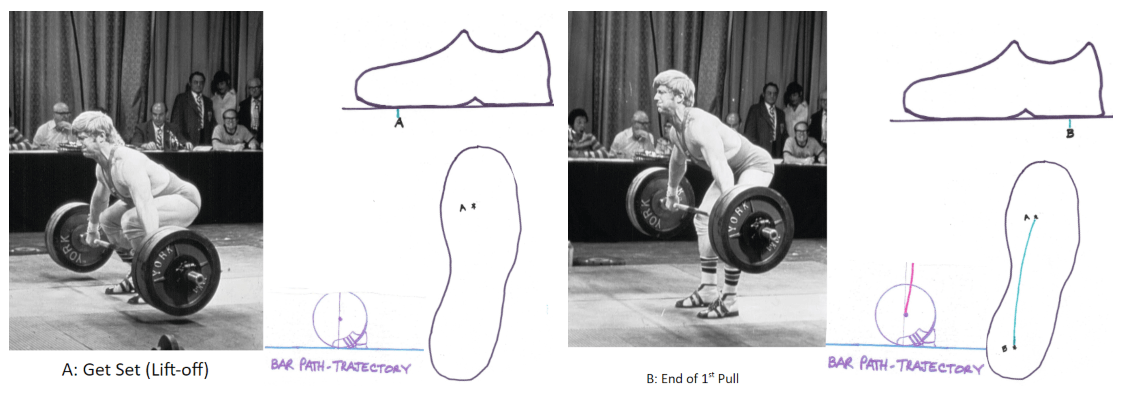
Let’s look at how all of this comes together into a single, well-coordinated effort to get the bar into a spot where maximum force can be applied. Thanks to Bruce Klemens for this great sequence of USA’s 1976 Olympic silver medalist Lee James working through the second pull
The initial lift-off includes keeping the torso in the same position while moving the barbell inward toward the shins. This shifts the center of pressure toward the rear of the foot. Avoid moving so far rearward that the toes lift off the platform. This is simply a matter of getting the knees out of the way as the bar rises. The knees move rearward, and the shoulders move forward, over the bar, and in front of the toes. The bar is about knee height at the end of this first pull phase.
The transition from first to second pull is crucial for success. Here again, the center of pressure moves, this time from the rear of the foot back to the front as the ankles, knees, and hips flex. This is not a matter of pulling the bar to the rear, it is now moving vertically.
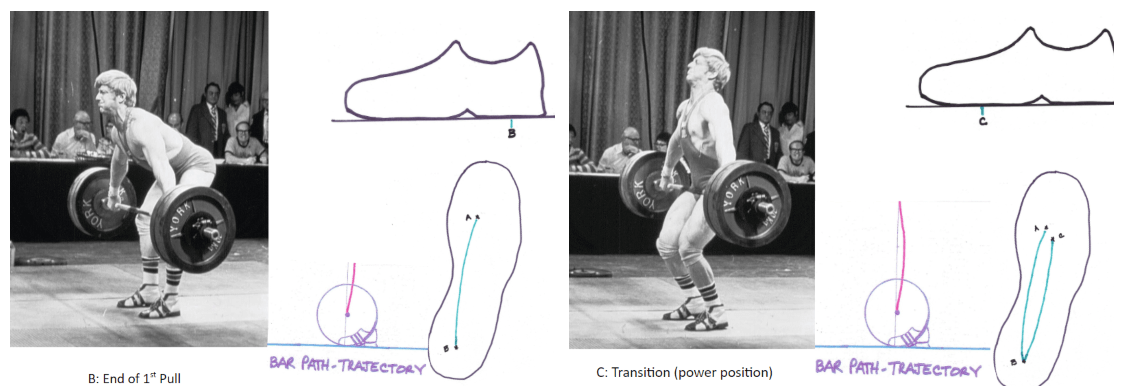
Done properly, the lifter now actually pushes (with the lower body), rather than pulls, the bar upward from the power position. Notice how close the bar is to the torso: Lee is not bouncing the bar off his hips!
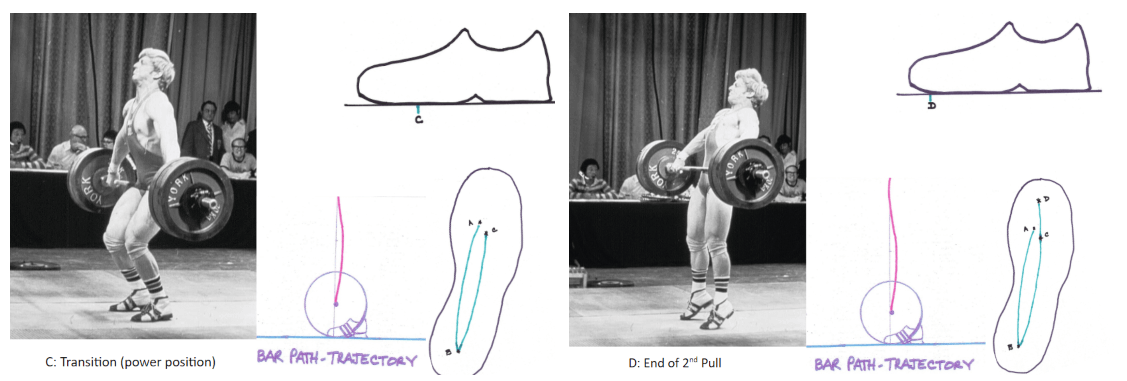
This is the explosive second pull, and here the lifter’s center of pressure is at the front of the foot as triple extension (ankles, knees, hips) occurs. It’s this use of the lower body that rapidly accelerates the bar overhead (or to the shoulders, in the case of a clean).
Practice, Practice, Practice
So, setting up properly in the first place is crucial to being able to get into the body’s most powerful position. Check out these great SportsEdTV video clips that explain and illustrate proper pulling technique for both lifts.
See the video on how to snatch:
See the video on how to clean jerk:
Also, follow our step-by-step instructions in order to learn how to master utilizing the foot dynamics covered in the installment. Practice slowly, focusing on the easy shift back and forth through the various centers of pressure. After this begins to feel more automatic work it into your full lifts with light weights and solid technique.