Martial Arts, Strength And Conditioning
Welcome and thanks for visiting...

how to build a wrestler’s physique

Wrestlers have the most muscular builds in combat sports. This is likely because physiological variables like strength may be the best predictor of success in elite wrestling [1].
But you don't need to wrestle to get a wrestler's physique. You can pick exercises to build strength and develop the muscles commonly used in wrestling. But what makes a wrestler's body?
Characteristics Of A Wrestler’s Body
When I think of a wrestler’s physique, I think of being a farm boy strong. What is farm boy strong, you ask? It's the powerful, dense look developed over years of shoveling dirt and throwing hay bails on the farm.
Bulging forearms, unrelenting grip strength, large shoulders and arms, and a powerful upper back represent the wrestler's physique.
You know when someone possesses farm boy strength and a wrestler’s body when they grab your wrist during training. Or have your back when standing. It’s like an inescapable vice.
This means the exercises we choose are to develop full body, vice-like strength with the "power look" of a dense upper back.
Best Strength Exercises For A Wrestler’s Physique
A typical bodybuilding or powerlifting routine won’t give you the wrestler’s physique or make you farm boy strong. Strength training for wrestling requires non-traditional lifts for the best transfer to the mats and building a rugged physique. So here's a non-exhaustive list of my favorite exercises for a wrestler's body.
Squat
Listen, if you want to build brute strength and raw power, there's no escaping the squat. This is the king of lower body exercises, working everything from your quads to your glutes. You're not limited to the back squat, either.
I'm a big believer in the front squat for wrestling performance, but you can also dabble with the Zercher squat and single-leg squat variations. Here is how to squat regardless of the variation you choose:
- Stand with your approximately shoulder width apart with your feet slightly turned out.
- Begin the descent by pushing your hips back and bending your knees simultaneously to sit straight down. Push your knees out and not directly forward to create space to sit between your legs.
- Lower your body ideally until your butt sits on your calves, maintaining an upright posture. Drive through your full foot to return to the starting position.
Floating Clean Pull
The floating clean pull is underrated for building a huge, dense upper back. You support the load through the entire set because the barbell never touches the floor after the initial pull. Further, you explosively shrug each rep, emphasizing the upper traps.
Wrestling is a game of posture. Winning the posture battle gives you entries to finish takedowns. The floating clean pull develops postural strength to resist posture breaks you may encounter on the mats. Here’s how to do it:
- Set up like when performing the clean pull. Shoulders over the barbell, weight centered in your feet, tension in your lats, big chest, and elbows pointed to the side. Use straps.
- Initiate the clean pull by pushing with your legs and maintaining the same back angle as the bar passes your knees. Stay over as long as possible before raising your shoulders and brushing the barbell up your thighs.
- Violently extend your hips, knees, and ankles and shrug the barbell vertically to complete the clean pull. Lower the barbell by reversing the movement, stopping below the knee when the plates are close to the floor.
- Reverse this descent and perform another clean pull. Repeat for the prescribed reps.
Snatch High Pull
I’ll scream this from the rooftop. There is no better exercise for building the upper back and traps than the snatch high pull. You can perform the exercise from the blocks or floor, but both variations will blow up your traps.
Further, you develop hip strength and postures similar to wrestling when carrying your opponent and finishing takedowns. Here’s how to do it:
- Set up in your snatch position with your shoulders over the barbell, weight centered in your feet, tension in your lats, big chest, and elbows pointed to the side. Use straps.
- Initiate the snatch high pull by pushing with your legs and maintaining the same back angle as the bar passes your knees. Stay over as long as possible before raising your shoulders and contacting your hips.
- Once you stand up tall, extend onto your toes and violently shrug your shoulders while pulling the barbell as high as you can, similar to an upright row.
Push Press
The push press is a staple in all my training programs. It teaches the ability to transfer force from the feet to the hands. A crucial physical skill for wrestling as you drive through your opponent with your legs to attach to your upper body. Here’s how to do it:
- Rack the barbell on your shoulders like you'd set up for a front squat. Keep your legs straight, slightly lower your elbows for a vertical forearm angle, and maintain a big chest for an upright posture.
- Start the dip by directing your weight toward your heels, ensuring full-foot ground contact. Descend your tailbone straight towards the ground as if a string is tied, pulling you down.
- As you dip, allow your knees to move slightly outward, mimicking the knee positioning in a squat. The dip depth should be roughly around a quarter-squat level, but you may need to adjust based on how it feels.
- When you hit the dip's lowest point, engage in a quick, forceful drive phase. Push powerfully through your entire foot, ending the drive with fully extended legs and elevated heels.
- Push with your arms simultaneously, finish with your arms and legs straight, and head forward to ensure a stable locked-out position.
Towel Pull-Up
This is a pull-up variation most people haven't seen, heard of, or performed in their training life. Try it, and you can thank me later. The forearm and grip strength you develop, alongside pulling strength and back size, is an epic combination.
Bonus points if you can hang at the end of your set or use weight. Here’s how to do it:
- Take 2 hand towels and throw them over a pull-up bar with slightly outside shoulder width. Grab the towels and ensure the entire towel is in your hand.
- Hang and make sure you have your grip secured. Drive your elbows to your ribs, maintaining a big chest. Lower yourself slowly.
Fat Bench Off Pins
The fat bar bench press off pins is my favorite bench press variation. Pressing a bar from a dead stop at chest height takes raw strength. And yes, the fat bar makes a huge difference in increasing the difficulty of the exercise.
You'll feel pressure on your hands and wrists if you've never pressed with a fat bar. If you can bench a certain weight from the pins, you can easily bench press it under normal conditions. Here’s how to do it:
- Set the pins (safeties) so the barbell is against your chest when lying on the bench. Set up like a bench press with the barbell on your lower chest. Create tension by pushing with your legs and hands against the barbell. If you don’t start with this tension, you can hurt yourself.
- Drive with all your force, extending your arms. Slowly lower the barbell to the pins and let it stop before pressing again.
Fat Barbell Curl
Isolation exercises like curls get a bad rap. Apparently, they’re “not functional.” Say that to the person fat barbell curling at least a dime on each end for reps.
The fat grip increases the contributions from your forearms and strengthens your wrists. An important factor for wrestling strength and a wrestler’s body. Here’s how to do it:
- Use an axle or place fat grips on a regular barbell. Stand tall, keeping your shoulders back, holding the fat bar with an underhand grip.
- Flex the elbows, curling the barbell to chest height. Slowly lower the barbell to the starting position.
Sandbag Bearhug Carry
Awkward object training is the underpinning philosophy behind being farm boy strong. Carrying odd objects puts you in positions you can't get into with traditional strength training. Wrestling is a form of odd object training as you manipulate another heavy human being.
The sandbag bearhug carry is the closest you’ll get to lifting another human and taking them for a walk. Here’s how to do it:
- Start with the sandbag lying on the ground. Slip your hands beneath either end, working your hands and forearms under it by rocking the sandbag side to side.
- Assume a squat stance while keeping your grip on the bag. Use your legs to lift the sandbag from the bent-over position. You'll need to readjust your grip as you lap the sandbag.
- You can opt for various grips, such as the monkey grip, seatbelt, Gable, butterfly, or the S grip.
Farmers Walk
No exercise list can be complete without the farmer's walk when developing a wrestler’s physique. It heavily taxes the grip, torso, and upper back as you fight to maintain an upright posture when walking with heavy implements by your side. Here's how to do it:
- Grip your implements as you would for a standard deadlift, with the implements positioned on each side of you. Lift the implements and stand tall before you start to move. Ensure the weight is stabilized before initiating any steps.
- Begin to move forward, taking small, measured steps and keeping tension. Lower the implements to the floor after you've covered your intended distance or elapsed time.
- Above all, make a conscious effort to retain a straight, upright posture throughout the exercise.
What About Wrestling Conditioning?
You may possess the wrestling body by consistently overloading the above exercises. But you can’t be “all show and no go.” So, you need a gas tank. One that allows you to repeat high-intensity efforts, encapsulating the demands of wrestling.
Especially since elite wrestlers possess greater power output during all-out sprint tests [2].
Does that mean we only perform hard circuits and blast ourselves with volume to replicate a match on the training mats? Not at all.
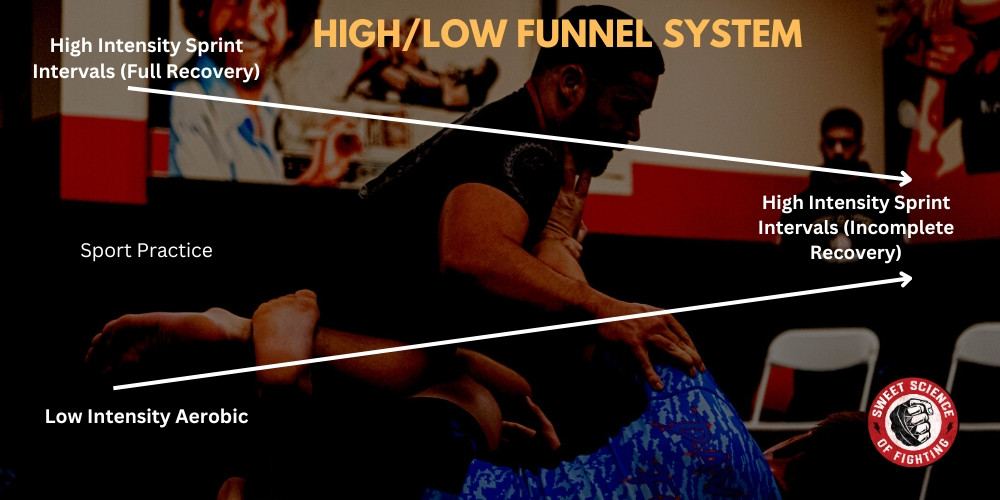
A simple guideline for wrestling conditioning is to start with a polarized approach targeting specific physiological adaptations and progress to a work output approach. The work output approach is where we tune our bodies to repeat high-intensity efforts.
Initially, you’ll target predominantly central adaptations (heart) through low-intensity conditioning while weaving high-intensity modalities for speed and power. How does this look?
Low-intensity conditioning is done through steady-state cardio and long high-intensity intervals (HIIT). While we can fill the heart chamber and stretch it to pool more blood per heart at different exercise intensities, lower-intensity conditioning gives us more time to be stretched.
This results in the heart pumping more blood to the working muscles. More blood equals more oxygen to create energy. Steady-state cardio is as easy as spending 30 – 60 mins doing continuous movement during nose breathing.
If you must breathe through your mouth, the intensity is likely too high for this type of work. For the long HIIT, you’ll perform 2-8 x 2-8 mins at approximately 80 – 95% of your maximum heart rate.
High-intensity modalities target pure power output and speed. These are usually best performed on off-feet cardio equipment like a spin bike and not sprinting on flat ground due to the risk of hamstring injury.
Here, you perform 6 – 10 sec maximal efforts with complete rest. Typically, 90 – 120 seconds rest. This is the polarized approach where you train either side of the intensity spectrum. Very intense and very easy.
If you only train for a wrestler's physique without training in wrestling (or another sport), this approach is still applicable but unnecessary.
You'll funnel the intensities closer together as you get further through your training. While pure speed and power conditioning alongside low-intensity cardio will develop peripheral (muscular) adaptations to use the increased influx of oxygen, we can push these adaptations further with incomplete recoveries during high-intensity exercise.

Now, you're performing more sprint intervals with incomplete rest. Anywhere from 10 – 30 seconds at maximal intensity with 10 – 60 sec rest.
These are brutal but will improve the ability of your muscles to use oxygen and resist fatigue. These are best done on a spin bike or equivalent to maximize stability for hard sprints. Plus, you'll become an absolute weapon, able to repeat high outputs while looking jacked.
Dietary Considerations For A Wrestler’s Body
None of these gains are possible without adequate fueling. This will be an overview to get you started with the best course of action regardless of whether you need to lose body fat or get bigger.
Starting with calories, a simple way to estimate your maintenance is to multiply your body weight in pounds by 15. For example, if you weigh 180 pounds, your maintenance daily caloric intake is approximately 2,700 calories.
You will need to check your weight each morning to see if this is your maintenance or if you need to strip back or increase your intake. But it’s a simple way to start.
Depending on whether you want to gain or lose weight, you can start 200 – 300 calories above or below this number. Or you can multiply your body weight in pounds by 12 – 13 for a caloric deficit and by 17 – 18 for a caloric surplus.
Once you've determined your caloric intake, it's time to calculate your macronutrient breakdown. Since you're training hard and often, we'll take a high-carb, lower-fat approach. This means setting protein at 0.8 – 1 g per pound of body weight, fat to 25% of total calories, and carbohydrates to take the rest.
Take our 180 lb wrestler, who needs to eat 3000 calories to gain weight. Because we'll be in a caloric surplus, we can be on the lower end of the protein spectrum. 180 x 0.8 equals 144 g of protein per day.
Fat is set to 25% of total calories. 750 / 9 equals 83 g of fat. The rest is carbohydrates, coming to 418 g per day. If you love meat or prefer to eat slightly higher fat, you can adjust and reduce the carbohydrate intake.
If you hate counting calories, I recommend only counting protein, as that is your most important target to hit outside of total caloric intake.
Summary
Your plan for a wrestler’s physique is laid out. Use the exercises within your lifting routine and adjust your diet for a high protein, high carbohydrate intake to get the most from your training. This will take time.
No significant body transformation is done in a few months. But following these principles can get you there faster.
References
- Nagle, F. J., Morgan, W. P., Hellickson, R. O., Serfass, R. C., &; Alexander, J. F. (1975). Spotting success traits in Olympic contenders. The Physician and Sportsmedicine, 3(12), 31-34.
- Morán-Navarro, R., Valverde-Conesa, A., López-Gullón, J. M., la Cruz-Sánchez, D., &; Pallarés, J. G. (2015). Can balance skills predict Olympic wrestling performance? Journal of Sport &; Health Research, 7(1).


